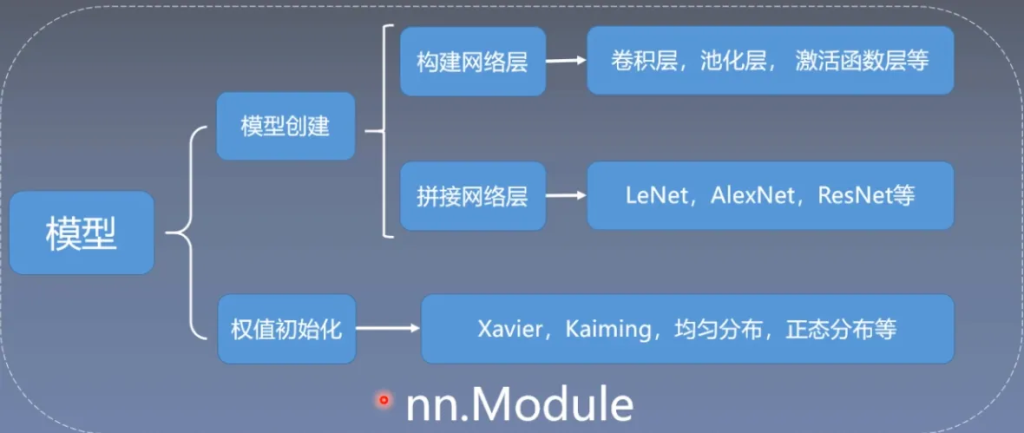
模型创建于nn.Module
模型创建步骤
首先构建网络层,其中包含了卷积层、池化层、激活函数层等
然后拼接网络层,按照一定的拓扑结构和顺序拼接,使其成为LeNet,AlexNet,ResNet等
最后进行权值初始化,Xavier,Kaiming,均匀分布,正态分布等
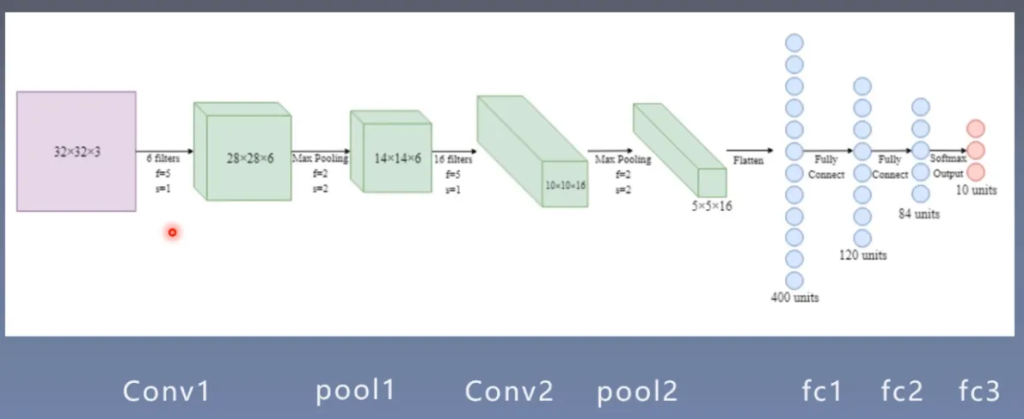
在之前的人民币二分类问题中我们就创建了一个LeNet,下面是LeNet的示意图
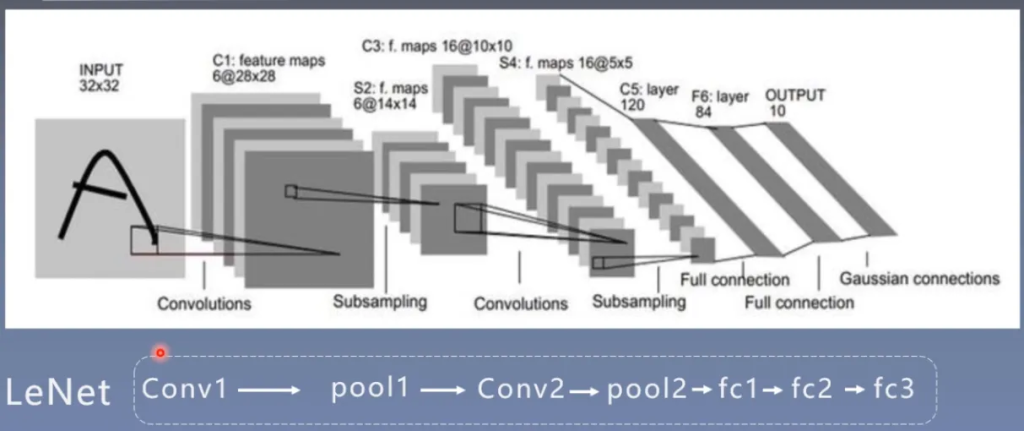
LeNet计算图:输入32x32x3的张量,经过复杂运算之后,最后输出长度为10的向量
模型构建两要素

代码解释
接下来我们通过代码来看看模型是如何被创建的。
# ============================ step 2/5 模型 ============================
net = LeNet(classes=2)
net.initialize_weights()
我们进入LeNet的定义:创建2个二维卷积层和3个全连接层
class LeNet(nn.Module):
    def __init__(self, classes):
        super(LeNet, self).__init__()
        self.conv1 = nn.Conv2d(3, 6, 5)
        self.conv2 = nn.Conv2d(6, 16, 5)
        self.fc1 = nn.Linear(16*5*5, 120)
        self.fc2 = nn.Linear(120, 84)
        self.fc3 = nn.Linear(84, classes)
随后进行了权值的初始化
下一步就是在模型训练时进行前向传播
# forward
    inputs, labels = data
    outputs = net(inputs)
转入到lenet.py中,可以看到前向传播的代码:
def forward(self, x):
        out = F.relu(self.conv1(x))
        out = F.max_pool2d(out, 2)
        out = F.relu(self.conv2(out))
        out = F.max_pool2d(out, 2)
        out = out.view(out.size(0), -1)
        out = F.relu(self.fc1(out))
        out = F.relu(self.fc2(out))
        out = self.fc3(out)
        return out
nn.Module
在模型模块中,所有模型和网络层都是继承于nn.Module类,因此非常有必要学习
torch.nn
torch.nn,是pytorch中的神经网络模块,包含了很多子模块
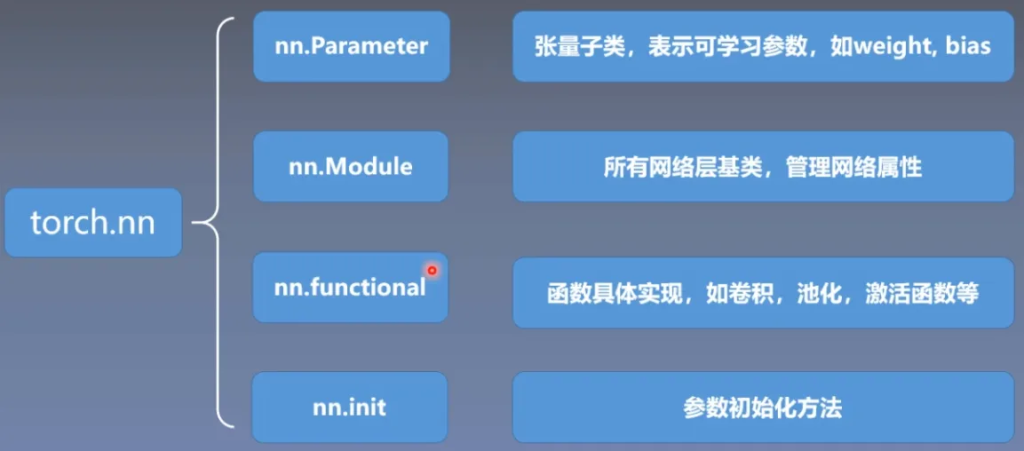
nn.Module
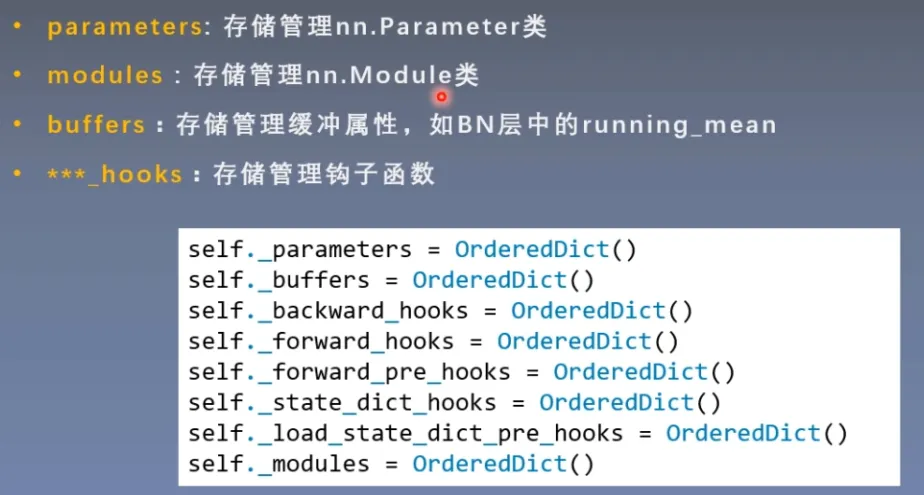
在nn.Module中有8个重要的属性
接下来我们回到之前的代码,看看nn.Module是如何创建的
class LeNet(nn.Module):
    def __init__(self, classes):
        super(LeNet, self).__init__()
        self.conv1 = nn.Conv2d(3, 6, 5)
        self.conv2 = nn.Conv2d(6, 16, 5)
        self.fc1 = nn.Linear(16*5*5, 120)
        self.fc2 = nn.Linear(120, 84)
        self.fc3 = nn.Linear(84, classes)
首先调用了父类中的init函数进行初始化
在lenet.py中,首先调用了父类中的init函数进行初始化,调用了module.py中的init函数
def __init__(self, *args, **kwargs) -> None:
    """Initialize internal Module state, shared by both nn.Module and ScriptModule."""
    torch._C._log_api_usage_once("python.nn_module")

    # Backward compatibility: no args used to be allowed when call_super_init=False
    if self.call_super_init is False and bool(kwargs):
            raise TypeError("{}.__init__() got an unexpected keyword argument '{}'"
                            "".format(type(self).__name__, next(iter(kwargs))))

    if self.call_super_init is False and bool(args):
            raise TypeError(f"{type(self).__name__}.__init__() takes 1 positional argument but {len(args) + 1} were"
                            " given")

    super().__setattr__('training', True)
    super().__setattr__('_parameters', OrderedDict())
    super().__setattr__('_buffers', OrderedDict())
    super().__setattr__('_non_persistent_buffers_set', set())
    super().__setattr__('_backward_pre_hooks', OrderedDict())
    super().__setattr__('_backward_hooks', OrderedDict())
    super().__setattr__('_is_full_backward_hook', None)
    super().__setattr__('_forward_hooks', OrderedDict())
    super().__setattr__('_forward_hooks_with_kwargs', OrderedDict())
    super().__setattr__('_forward_hooks_always_called', OrderedDict())
    super().__setattr__('_forward_pre_hooks', OrderedDict())
    super().__setattr__('_forward_pre_hooks_with_kwargs', OrderedDict())
    super().__setattr__('_state_dict_hooks', OrderedDict())
    super().__setattr__('_state_dict_pre_hooks', OrderedDict())
    super().__setattr__('_load_state_dict_pre_hooks', OrderedDict())
    super().__setattr__('_load_state_dict_post_hooks', OrderedDict())
    super().__setattr__('_modules', OrderedDict())
可以看到设置了很多的属性,以及training训练状态设置为true,这个函数就是初始化了nn.Module的初始属性
下一步创建卷积层,我们进入到conv.py中看到init函数
class Conv2d(_ConvNd):
def __init__(
        self,
        in_channels: int,
        out_channels: int,
        kernel_size: _size_2_t,
        stride: _size_2_t = 1,
        padding: Union[str, _size_2_t] = 0,
        dilation: _size_2_t = 1,
        groups: int = 1,
        bias: bool = True,
        padding_mode: str = 'zeros',  # TODO: refine this type
        device=None,
        dtype=None
    ) -> None:
        factory_kwargs = {'device': device, 'dtype': dtype}
        kernel_size_ = _pair(kernel_size)
        stride_ = _pair(stride)
        padding_ = padding if isinstance(padding, str) else _pair(padding)
        dilation_ = _pair(dilation)
        super().__init__(
            in_channels, out_channels, kernel_size_, stride_, padding_, dilation_,
            False, _pair(0), groups, bias, padding_mode, **factory_kwargs)
Conv2d这个类继承于ConvNd,init中设置了一些参数属性,然后调用了父类的init函数
class _ConvNd(Module):
    def __init__(self,
                 in_channels: int,
                 out_channels: int,
                 kernel_size: Tuple[int, ...],
                 stride: Tuple[int, ...],
                 padding: Tuple[int, ...],
                 dilation: Tuple[int, ...],
                 transposed: bool,
                 output_padding: Tuple[int, ...],
                 groups: int,
                 bias: bool,
                 padding_mode: str,
                 device=None,
                 dtype=None) -> None:
        factory_kwargs = {'device': device, 'dtype': dtype}
        super().__init__()
可以看到ConvNd继承于Module,也调用了Module的init函数,初始化了8个有序字典
经过这一系列的操作,我们就成功创建了卷积层并存入module进行管理
在我们创建第2个卷积层后,在赋值时,会被setattr函数拦截,会跳转到Module中的setattr函数
def add_module(self, name: str, module: Optional['Module']) -> None:
        r"""Add a child module to the current module.

        The module can be accessed as an attribute using the given name.

        Args:
            name (str): name of the child module. The child module can be
                accessed from this module using the given name
            module (Module): child module to be added to the module.
        """
        if not isinstance(module, Module) and module is not None:
            raise TypeError(f"{torch.typename(module)} is not a Module subclass")
        elif not isinstance(name, str):
            raise TypeError(f"module name should be a string. Got {torch.typename(name)}")
        elif hasattr(self, name) and name not in self._modules:
            raise KeyError(f"attribute '{name}' already exists")
        elif '.' in name:
            raise KeyError(f"module name can't contain \".\", got: {name}")
        elif name == '':
            raise KeyError("module name can't be empty string \"\"")
        for hook in _global_module_registration_hooks.values():
            output = hook(self, name, module)
            if output is not None:
                module = output
        self._modules[name] = module
判断是否为module,然后加入到_modules中
总结

模型容器与AlexNet构建
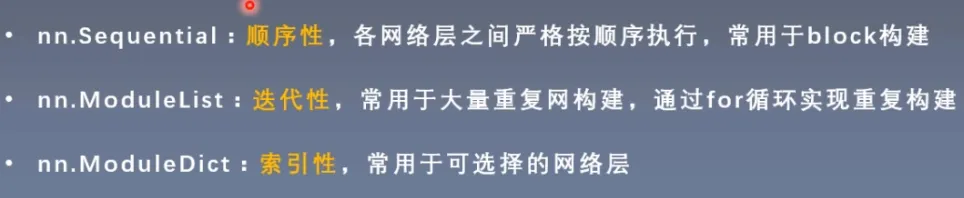
模型容器——Containers
在pytorch中提供了三个常用的Containers
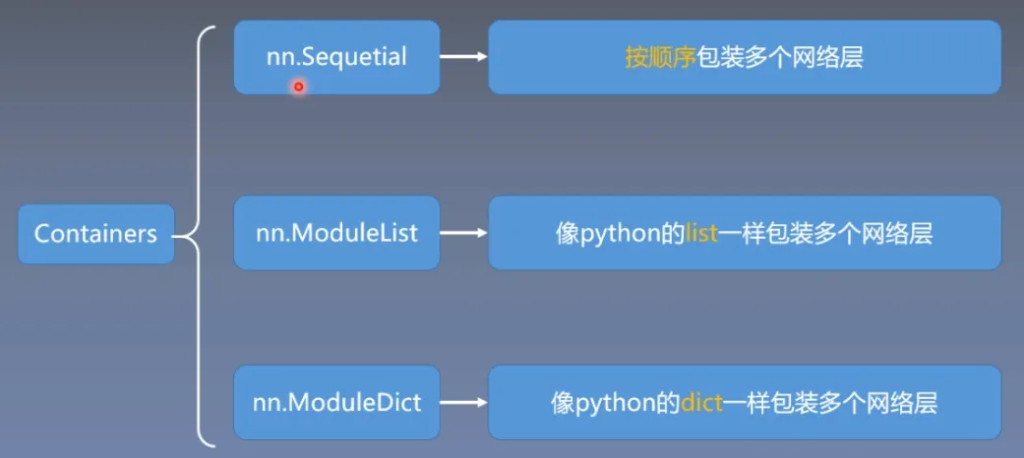
Sequential
在机器学习中有特征工程这一操作,但在深度学习中弱化了这一概念。
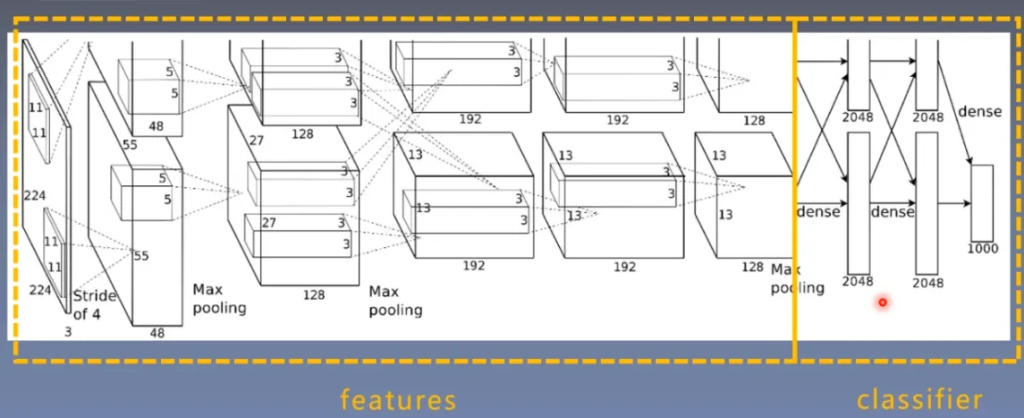
在深度学习中也有习惯,以全连接层为界限,将模型划分为特征提取模块和分类模块。
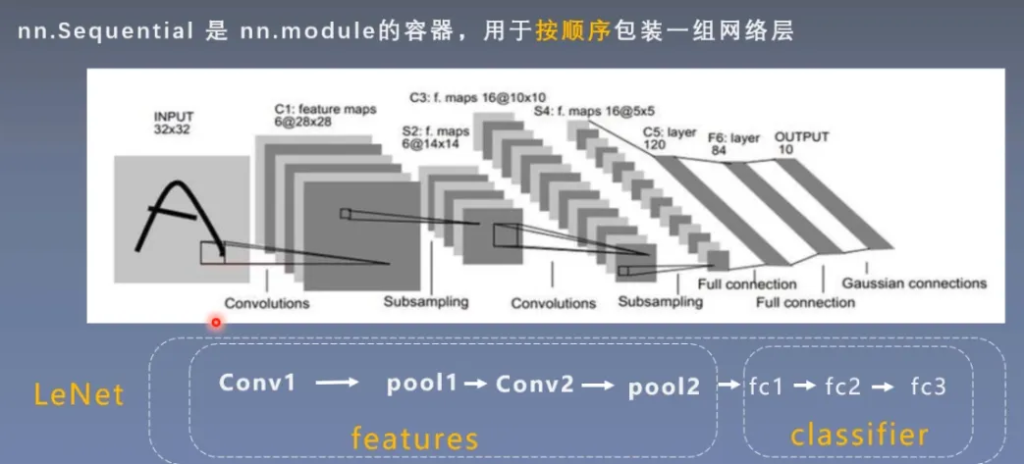
我们可以用Sequential分别包装两组网络层,然后组装成一个神经网络
方法一
直接看代码,创建一个类,可以将之前LeNet分为两部分,用Sequential包装
然后定义前向传播
# ============================ Sequential
class LeNetSequential(nn.Module):
    def __init__(self, classes):
        super(LeNetSequential, self).__init__()
        self.features = nn.Sequential(
            nn.Conv2d(3, 6, 5),
            nn.ReLU(),
            nn.MaxPool2d(kernel_size=2, stride=2),
            nn.Conv2d(6, 16, 5),
            nn.ReLU(),
            nn.MaxPool2d(kernel_size=2, stride=2),)

        self.classifier = nn.Sequential(
            nn.Linear(16*5*5, 120),
            nn.ReLU(),
            nn.Linear(120, 84),
            nn.ReLU(),
            nn.Linear(84, classes),)

    def forward(self, x):
        x = self.features(x)
        x = x.view(x.size()[0], -1)
        x = self.classifier(x)
        return x
接下来我们进入container.py中看看Sequential这个类
Sequential这个类依旧继承于Module,在init函数中调用了父类的init,随后判断参数是否为字典,非字典则for循环轮流调用add_module这个方法,将网络添加到Sequential中
class Sequential(Module):
    def __init__(self, *args):
        super().__init__()
        if len(args) == 1 and isinstance(args[0], OrderedDict):
            for key, module in args[0].items():
                self.add_module(key, module)
        else:
            for idx, module in enumerate(args):
                self.add_module(str(idx), module)
回到原来的代码,创建一个随机张量,传入网络
net = LeNetSequential(classes=2)
net = LeNetSequentialOrderDict(classes=2)

fake_img = torch.randn((4, 3, 32, 32), dtype=torch.float32)

output = net(fake_img)
随后跳转到module的__call__函数
def __call__(self, *args: Any, **kwargs: Any) -> Any:
        if self.with_module:
            module = self.module()
            if module is None:
                raise RuntimeError("You are trying to call the hook of a dead Module!")
            return self.hook(module, *args, **kwargs)
        return self.hook(*args, **kwargs)
随后跳转到我们自定义的forward函数
def forward(self, x):
        x = self.features(x)
        x = x.view(x.size()[0], -1)
        x = self.classifier(x)
        return x
之后再进入container.py中的forward,非常简洁,直接用for循环module,对输入的参数进行计算
def forward(self, input):
        for module in self:
            input = module(input)
        return input
最后我们得到了一个output
方法二
方法一中网络层是以编号 按顺序排列的,当网络层过多时,就很不方便。
因此还有另一种方法,可以给网络层进行命名。
class LeNetSequentialOrderDict(nn.Module):
    def __init__(self, classes):
        super(LeNetSequentialOrderDict, self).__init__()

        self.features = nn.Sequential(OrderedDict({
            'conv1': nn.Conv2d(3, 6, 5),
            'relu1': nn.ReLU(inplace=True),
            'pool1': nn.MaxPool2d(kernel_size=2, stride=2),

            'conv2': nn.Conv2d(6, 16, 5),
            'relu2': nn.ReLU(inplace=True),
            'pool2': nn.MaxPool2d(kernel_size=2, stride=2),
        }))

        self.classifier = nn.Sequential(OrderedDict({
            'fc1': nn.Linear(16*5*5, 120),
            'relu3': nn.ReLU(),

            'fc2': nn.Linear(120, 84),
            'relu4': nn.ReLU(inplace=True),

            'fc3': nn.Linear(84, classes),
        }))

    def forward(self, x):
        x = self.features(x)
        x = x.view(x.size()[0], -1)
        x = self.classifier(x)
        return x
直接进入container.py,sequential类的init函数,当我们输入的是一个OrderedDict,则会通过字典来给网络层一个key,并添加值。(字典(泛型):键值对)
def __init__(self, *args):
        super().__init__()
        if len(args) == 1 and isinstance(args[0], OrderedDict):
            for key, module in args[0].items():
                self.add_module(key, module)
        else:
            for idx, module in enumerate(args):
                self.add_module(str(idx), module)
ModuleList
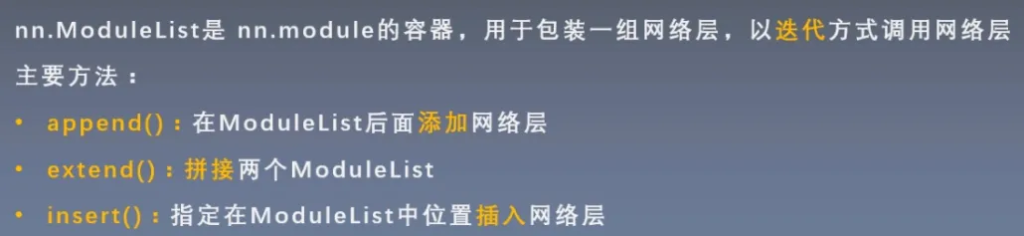
直接看代码,ModuleList初始化直接循环创建
# ============================ ModuleList

class ModuleList(nn.Module):
    def __init__(self):
        super(ModuleList, self).__init__()
        self.linears = nn.ModuleList([nn.Linear(10, 10) for i in range(20)])

    def forward(self, x):
        for i, linear in enumerate(self.linears):
            x = linear(x)
        return x
进入ModuleList类,看看init,十分简单,判断是否为空,随后进行module的拼接
    def __init__(self, modules: Optional[Iterable[Module]] = None) -> None:
        super().__init__()
        if modules is not None:
            self += modules
之后在前向传播中,通过for循环获得每一个网络层
ModuleDict
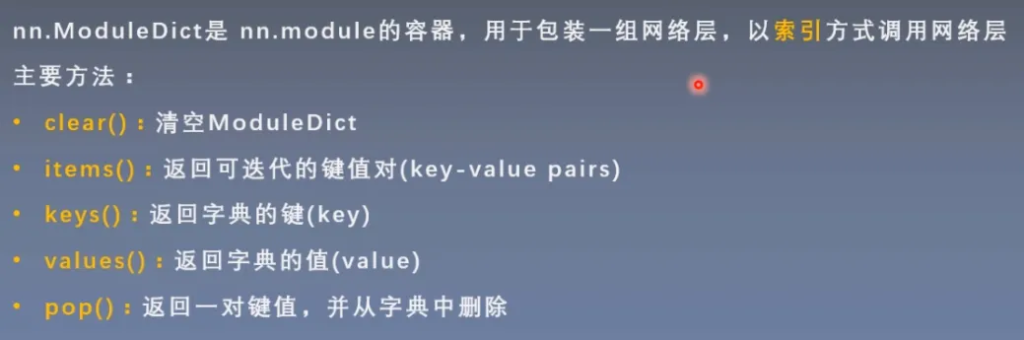
依旧是看代码,与Sequential有点类似
class ModuleDict(nn.Module):
    def __init__(self):
        super(ModuleDict, self).__init__()
        self.choices = nn.ModuleDict({
            'conv': nn.Conv2d(10, 10, 3),
            'pool': nn.MaxPool2d(3)
        })

        self.activations = nn.ModuleDict({
            'relu': nn.ReLU(),
            'prelu': nn.PReLU()
        })

    def forward(self, x, choice, act):
        x = self.choices[choice](x)
        x = self.activations[act](x)
        return x
总结
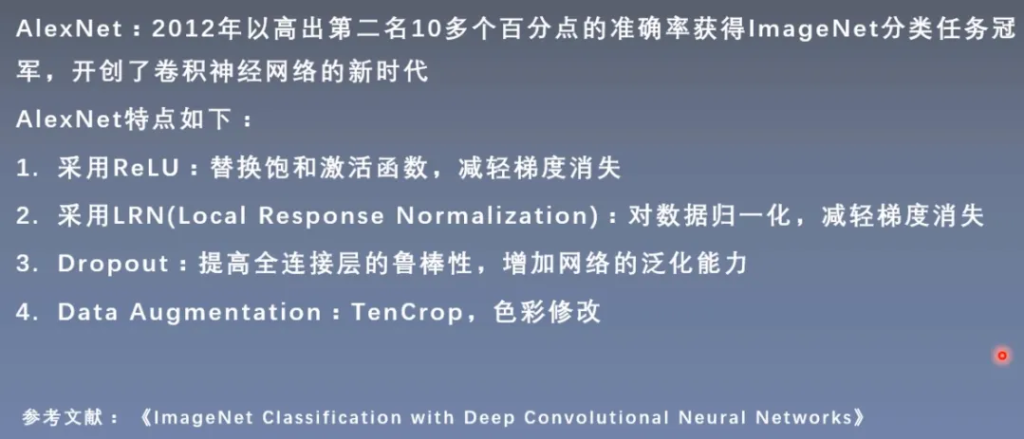
AlexNet
简介
结构:
代码:alexnet.py
class AlexNet(nn.Module):
    def __init__(self, num_classes: int = 1000, dropout: float = 0.5) -> None:
        super().__init__()
        _log_api_usage_once(self)
        self.features = nn.Sequential(
            nn.Conv2d(3, 64, kernel_size=11, stride=4, padding=2),
            nn.ReLU(inplace=True),
            nn.MaxPool2d(kernel_size=3, stride=2),
            nn.Conv2d(64, 192, kernel_size=5, padding=2),
            nn.ReLU(inplace=True),
            nn.MaxPool2d(kernel_size=3, stride=2),
            nn.Conv2d(192, 384, kernel_size=3, padding=1),
            nn.ReLU(inplace=True),
            nn.Conv2d(384, 256, kernel_size=3, padding=1),
            nn.ReLU(inplace=True),
            nn.Conv2d(256, 256, kernel_size=3, padding=1),
            nn.ReLU(inplace=True),
            nn.MaxPool2d(kernel_size=3, stride=2),
        )
        self.avgpool = nn.AdaptiveAvgPool2d((6, 6))
        self.classifier = nn.Sequential(
            nn.Dropout(p=dropout),
            nn.Linear(256 * 6 * 6, 4096),
            nn.ReLU(inplace=True),
            nn.Dropout(p=dropout),
            nn.Linear(4096, 4096),
            nn.ReLU(inplace=True),
            nn.Linear(4096, num_classes),
        )

    def forward(self, x: torch.Tensor) -> torch.Tensor:
        x = self.features(x)
        x = self.avgpool(x)
        x = torch.flatten(x, 1)
        x = self.classifier(x)
        return x
经过以上的学习,这里就能看明白了。
卷积层
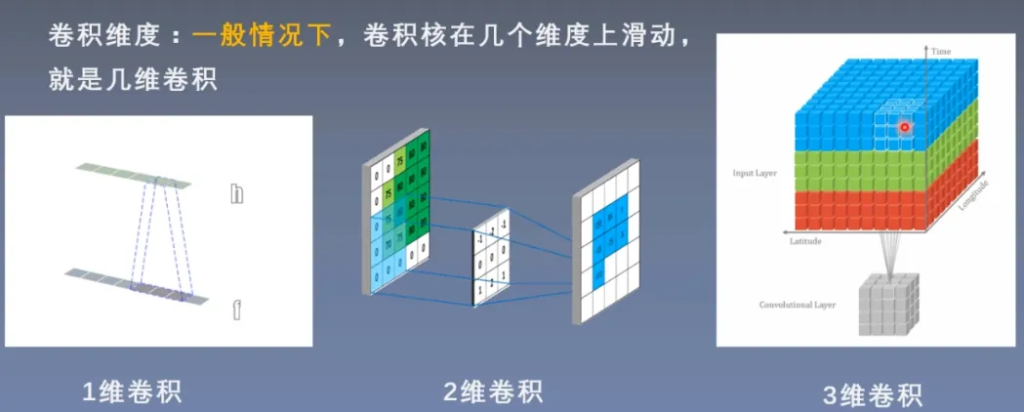
1d/2d/3d Convolution
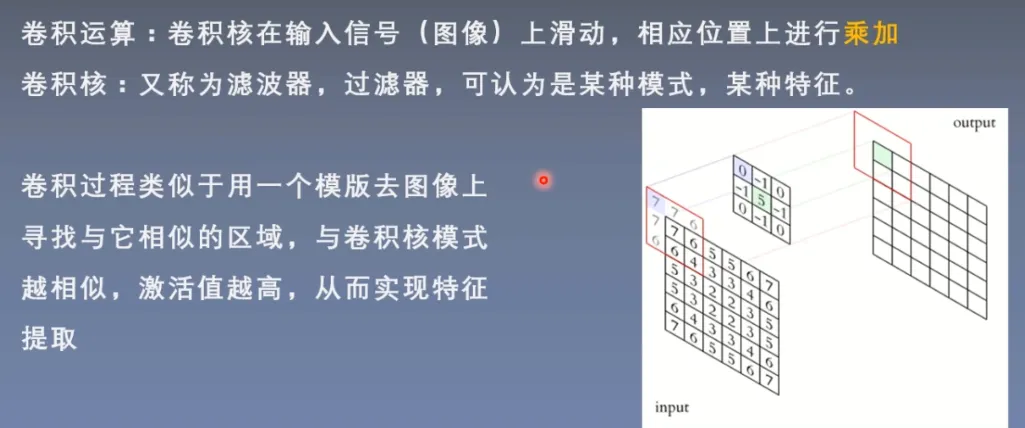
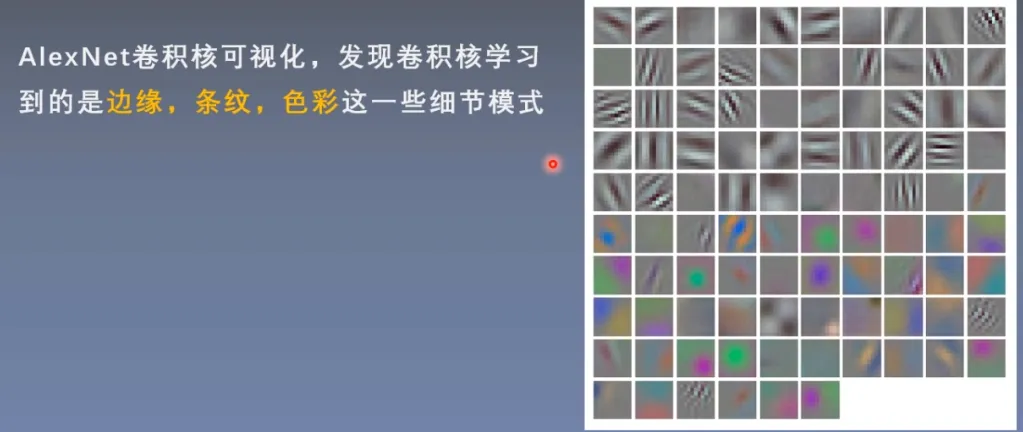
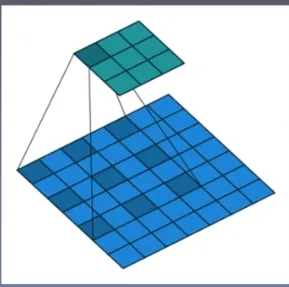
卷积核是特征提取器
卷积维度
nn.Conv2d
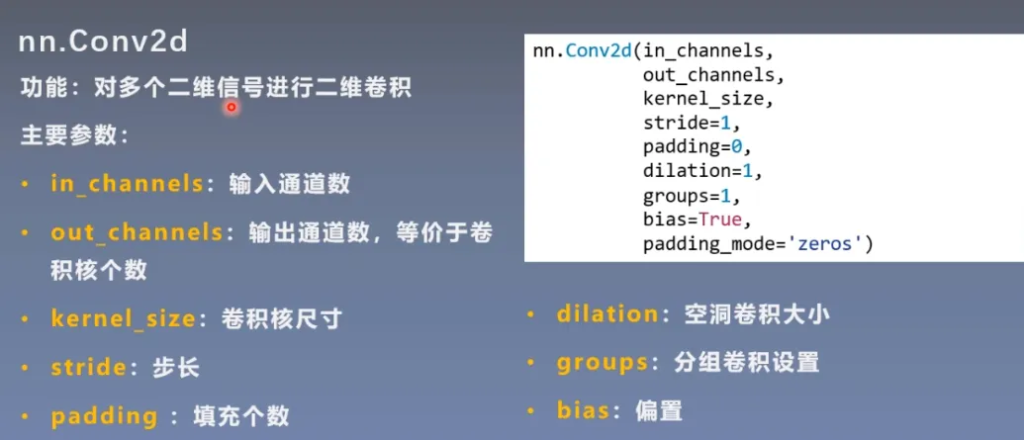
这里注意一下空洞卷积:
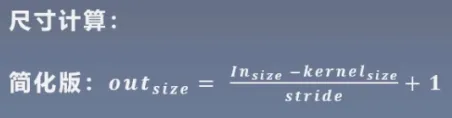
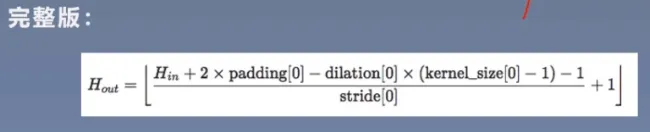
尺寸:
看代码
set_seed(3) # 设置随机种子
# ================================= load img ==================================
path_img = os.path.join(os.path.dirname(os.path.abspath(__file__)), "lena.png")
img = Image.open(path_img).convert('RGB') # 0~255
# convert to tensor
img_transform = transforms.Compose([transforms.ToTensor()])
img_tensor = img_transform(img)
img_tensor.unsqueeze_(dim=0) # C*H*W to B*C*H*W
# ================================= create convolution layer ==================================
# ================ 2d
flag = 1
# flag = 0
if flag:
conv_layer = nn.Conv2d(3, 1, 3) # input:(i, o, size) weights:(o, i , h, w)
nn.init.xavier_normal_(conv_layer.weight.data)
# calculation
img_conv = conv_layer(img_tensor)
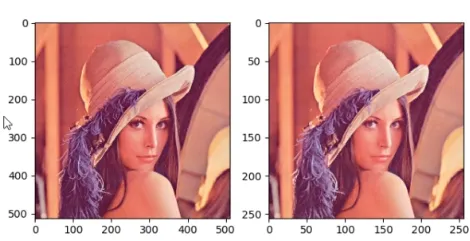
# ================================= visualization ==================================
print("卷积前尺寸:{}\n卷积后尺寸:{}".format(img_tensor.shape, img_conv.shape))
img_conv = transform_invert(img_conv[0, 0:1, ...], img_transform)
img_raw = transform_invert(img_tensor.squeeze(), img_transform)
plt.subplot(122).imshow(img_conv, cmap='gray')
plt.subplot(121).imshow(img_raw)
plt.show()转置卷积
转置卷积又称为反卷积(Deconvolution)和部分跨越卷积(Fractionally-strided Convolution),用于对图像进行上采样(UpSample)
为什么称为转置卷积?
正常卷积:
假设图像尺寸为4*4,卷积核为3*3,padding=0,stride=1
图像 I16*1 卷积核:K4*16 输出:O4*1 = K4*16 * I16*1
转置卷积:
假设图像尺寸为2*2,卷积核为3*3*3, padding=0,stride=1
图像:I4*1 卷积核:K16*4 输出:O16*1 = K16*4 * I4*1
卷积核在形状上是转置的,不可逆。
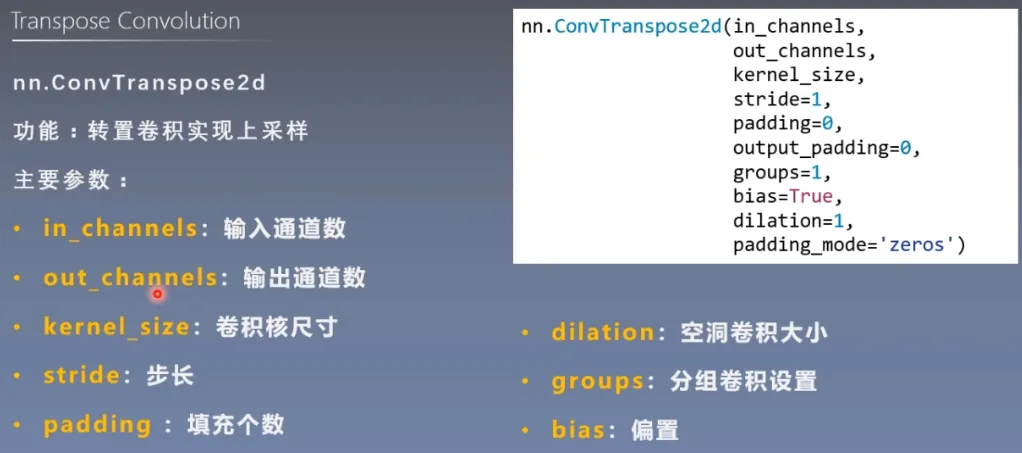
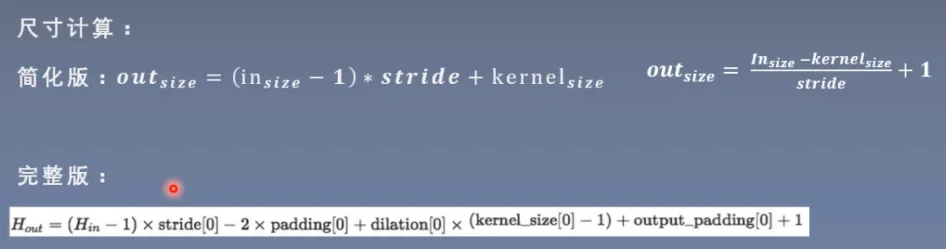
尺寸:
看代码
# ================ transposed
# flag = 1
flag = 0
if flag:
    conv_layer = nn.ConvTranspose2d(3, 1, 3, stride=2)   # input:(i, o, size)
    nn.init.xavier_normal_(conv_layer.weight.data)

    # calculation
    img_conv = conv_layer(img_tensor)
池化、线性、激活函数层
池化层
池化运算:对信号进行“收集”并“总结”,类似水池收集水资源,因而得名池化层
“收集”:多变少
“总结”:最大值/平均值
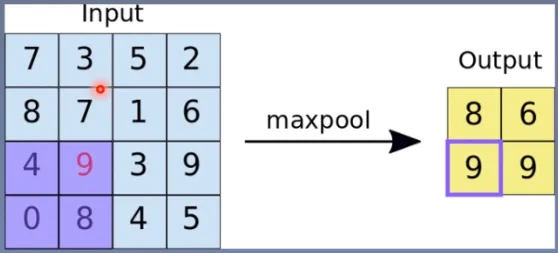
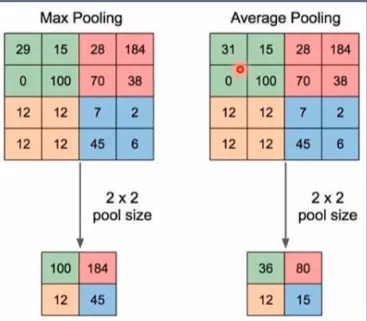
最大池化
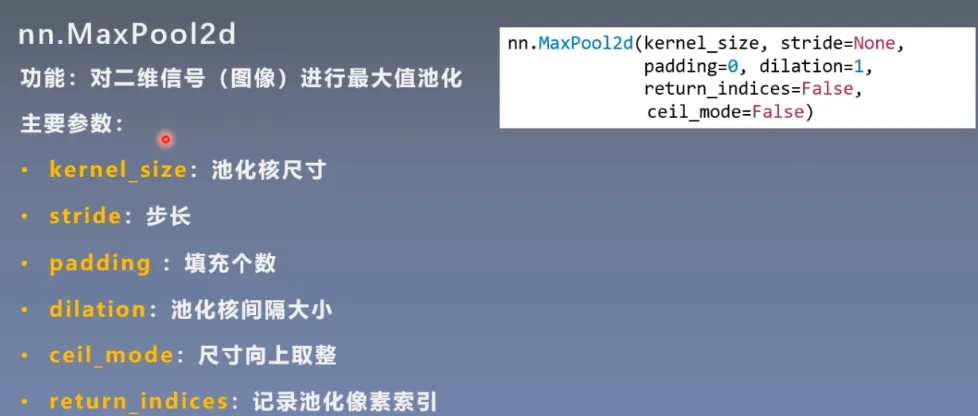
这里注意两个参数
- ceil_mode:尺寸向上取整
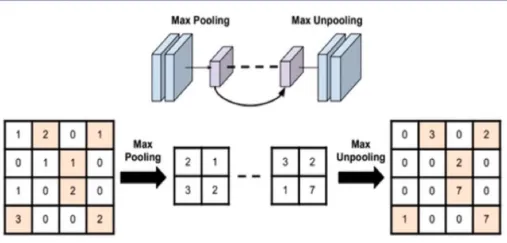
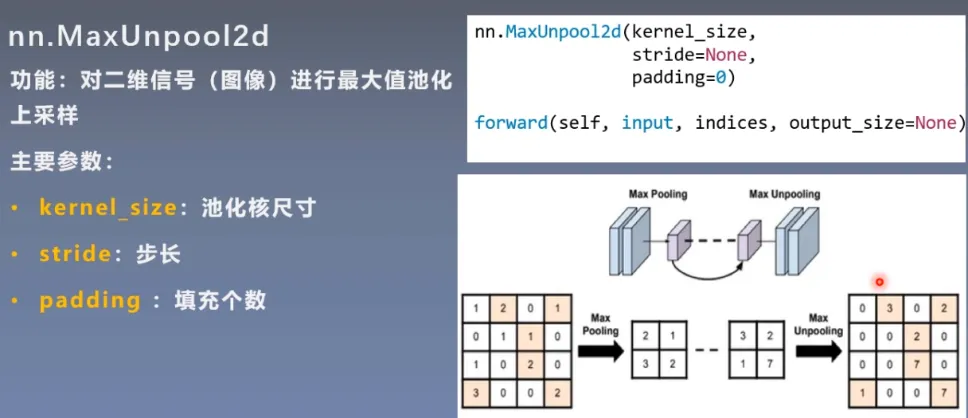
- return_indices:记录池化像素索引,在反池化的时候使用。如图,在池化前,记录像素索引,反池化时根据索引进行填充。
看代码
# ================ maxpool
# flag = 1
flag = 0
if flag:
maxpool_layer = nn.MaxPool2d((2, 2), stride=(2, 2)) # input:(i, o, size) weights:(o, i , h, w)
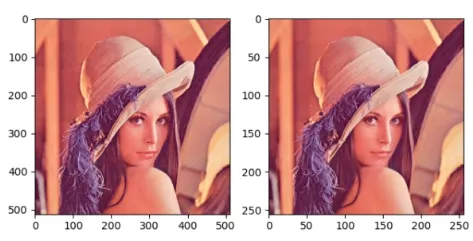
img_pool = maxpool_layer(img_tensor)效果:可以看到池化后,图片变化很小,所以池化操作可以剔除冗余信息。
平均池化
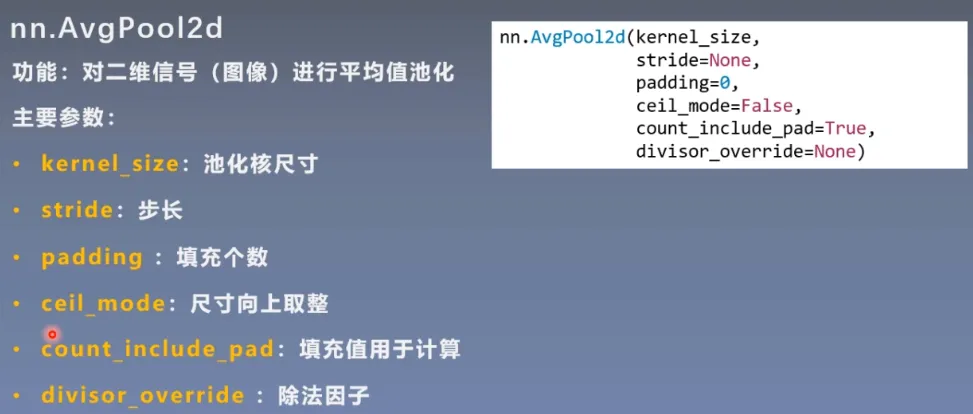
divisor_override:除法因子,可以不除以像素的个数,而是除以除法因子
上代码
# ================ avgpool
# flag = 1
flag = 0
if flag:
    avgpoollayer = nn.AvgPool2d((2, 2), stride=(2, 2))   # input:(i, o, size) weights:(o, i , h, w)
    img_pool = avgpoollayer(img_tensor)
效果:与最大池化亮度上有所不同
最大反池化
代码
# ================ max unpool
# flag = 1
flag = 0
if flag:
    # pooling
    img_tensor = torch.randint(high=5, size=(1, 1, 4, 4), dtype=torch.float)
    maxpool_layer = nn.MaxPool2d((2, 2), stride=(2, 2), return_indices=True)
    img_pool, indices = maxpool_layer(img_tensor)

    # unpooling
    img_reconstruct = torch.randn_like(img_pool, dtype=torch.float)
    maxunpool_layer = nn.MaxUnpool2d((2, 2), stride=(2, 2))
    img_unpool = maxunpool_layer(img_reconstruct, indices)

    print("raw_img:\n{}\nimg_pool:\n{}".format(img_tensor, img_pool))
    print("img_reconstruct:\n{}\nimg_unpool:\n{}".format(img_reconstruct, img_unpool))
线性层
线性层又称全连接层,其每个神经元与上一层所有神经元相连实现对前一层的线性组合,线性变换
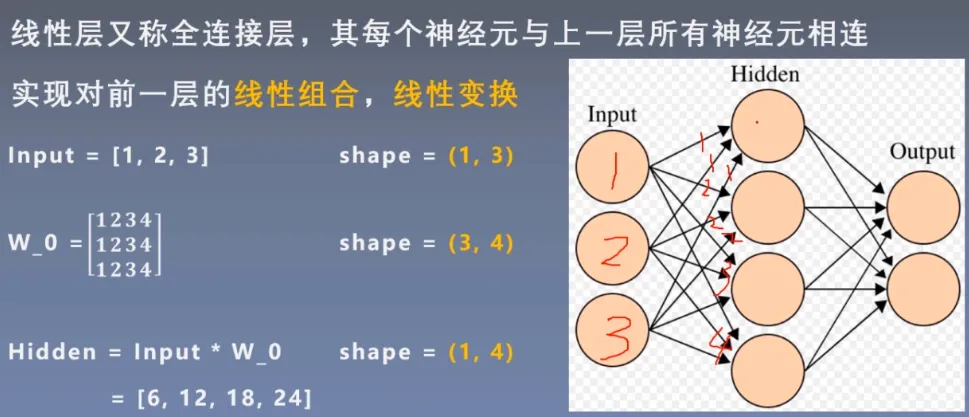
线性加权求和
nn.Linear
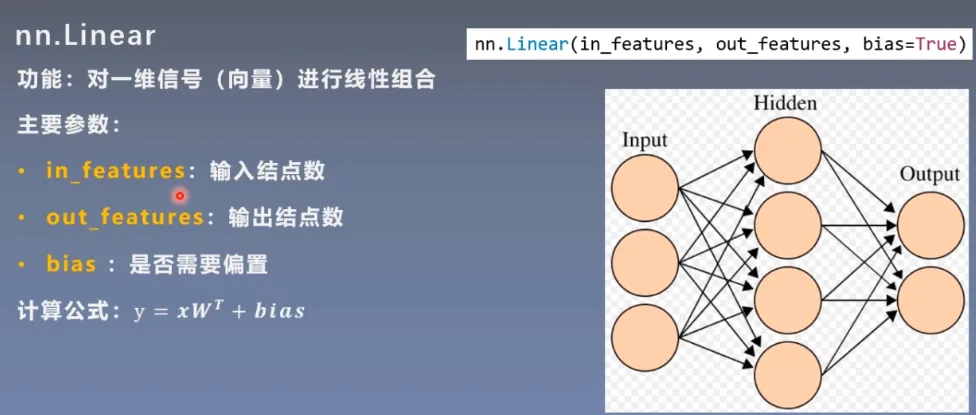
代码
# ================ linear
flag = 1
# flag = 0
if flag:
    inputs = torch.tensor([[1., 2, 3]])
    linear_layer = nn.Linear(3, 4)
    linear_layer.weight.data = torch.tensor([[1., 1., 1.],
                                             [2., 2., 2.],
                                             [3., 3., 3.],
                                             [4., 4., 4.]])
    #偏置
    linear_layer.bias.data.fill_(0.5)
    output = linear_layer(inputs)
    print(inputs, inputs.shape)
    print(linear_layer.weight.data, linear_layer.weight.data.shape)
    print(output, output.shape)
激活函数层
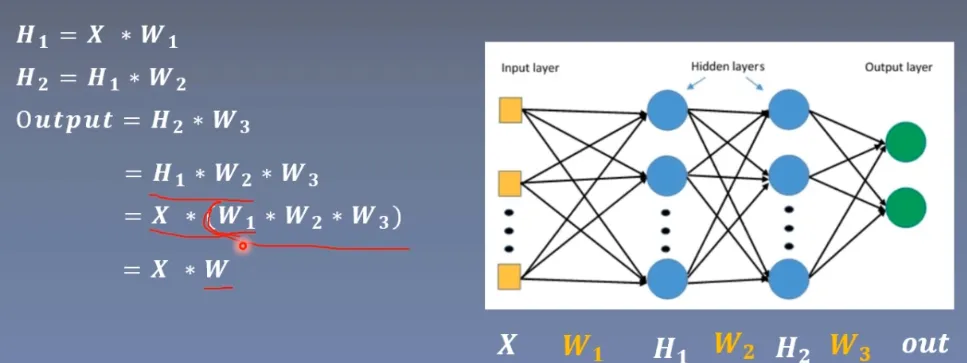
激活函数对特征进行非线性变换,赋予多层神经网络具有深度的意义
如何理解:
图中可以看到有三个线性层W1,W2,W3,输入后分别乘上其矩阵,根据矩阵的结合性,相当于乘上了一个矩阵,所以n个线性层等于1一个线性层。
(神经网络是为了拟合一个函数,全连接层只能拟合线性的,所以再多的线性层都只能拟合线性的,而激活函数可以是非线性的,就给神经网络引入了非线性)
nn.Sigmoid
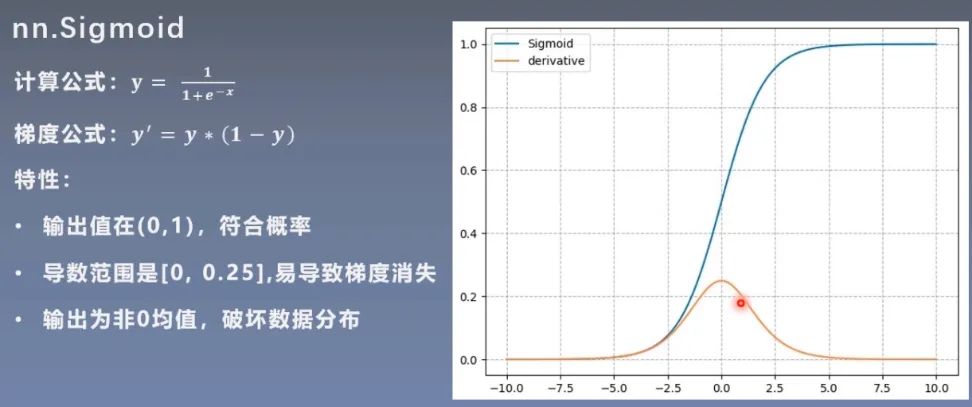
易导致梯度消失
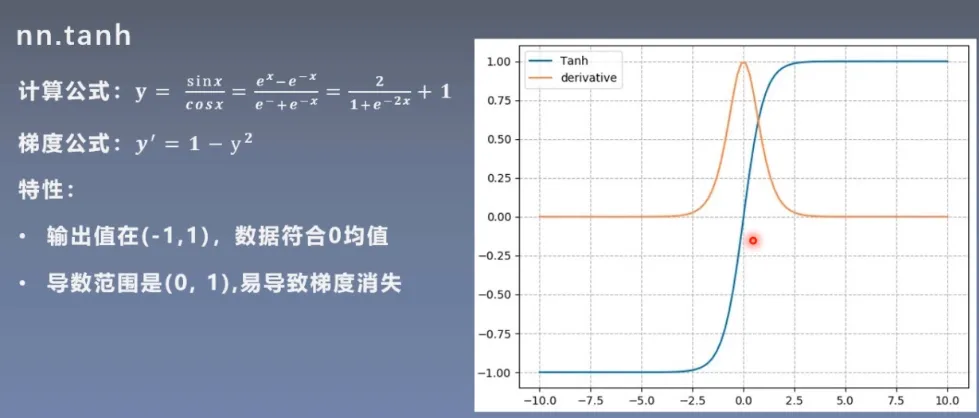
nn.tanh
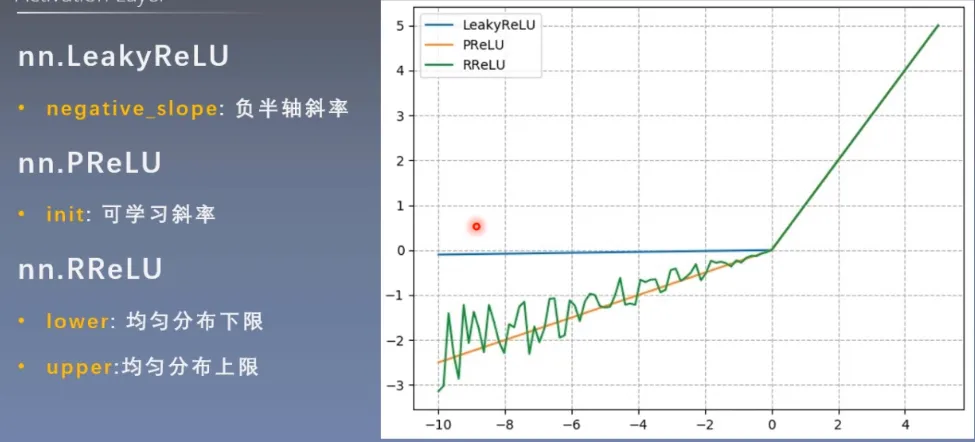
nn.ReLU
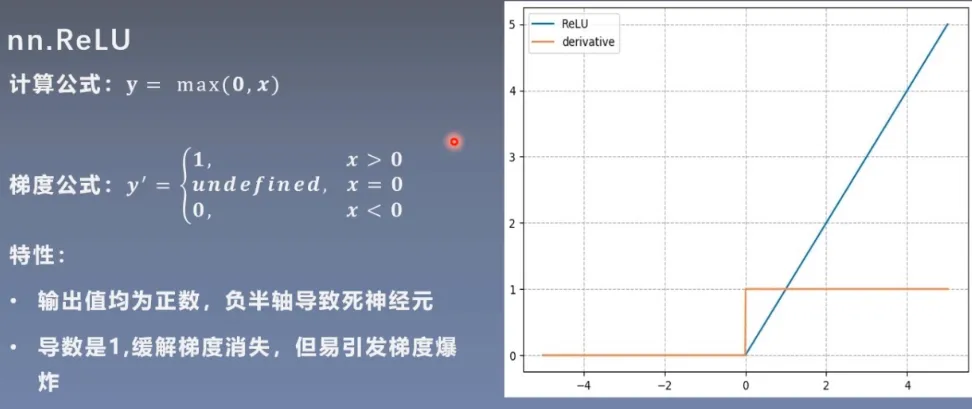
LeakyReLU、PReLU、RREeLU